Using the Antithesis Notebook#
To interact with the Antithesis multiverse, we provide a browser-based interactive notebook.
You might prefer to dive into our notebook and figure things out for yourself. But if not, here are a few major concepts to help you understand this interface.
Programming model#
The notebook is a code editor that automatically reevaluates its contents on every keystroke. The primary language of the notebook is JavaScript. Most of the JavaScript language constructs and standard libary can be used as normal. Antithesis built-in functions all implement runtime type-checking. Evaluation flows from the top of the notebook to the bottom, just as in a normal JavaScript file. In this sense, the notebook is ordered.
You may be familiar with other notebook applications such as Jupyter. The Antithesis notebook superficially resembles these, but there is a very important difference. Most other notebooks require you to explicitly “run” the contents of a cell, which causes it to recompute. The Antithesis notebook is more like a spreadsheet – everything automatically runs without you doing anything. To make this scalable, we do sophisticated dependency tracking, so when you change one part of the notebook, only the parts that have depenedencies on it recompute their values. In other words, it’s reactive.
Our name for this programming model is ordered reactivity.
Cells and scoping#
Like other notebooks, and like a spreadsheet, the Antithesis notebook is divided into cells. A cell is the minimal unit of reactive computation – if any part of a cell recalculates, the whole cell must recalculate. Cells can be extremely simple, for instance a single variable assignment. Or they can be very complex, and contain entire JavaScript programs. The previous video had two simple cells.
Cells are created with linebreaks. Inserting a newline character will split a cell into two. If you want your cell to contain blank lines (for instance because it is a large cell that defines a function and you want to separate lines for readability), you may put whitespace characters (tabs or spaces) on that line, and it will once again be a single cell.
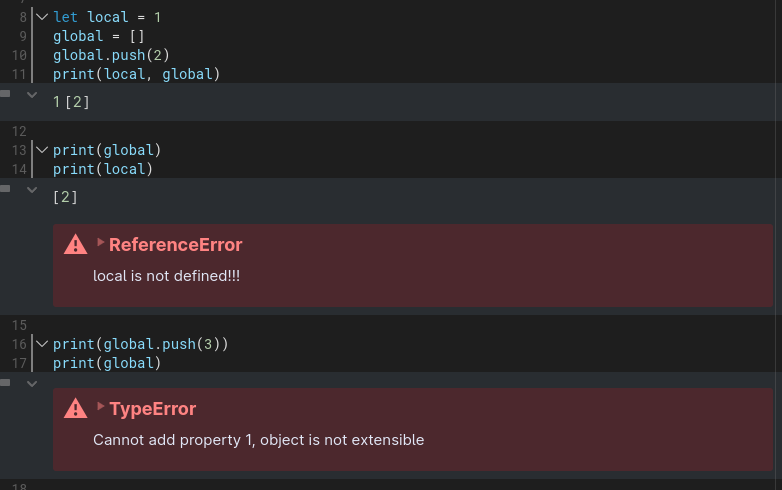
Variables declared in one cell are accessible in another cell if and only if the declaration is not preceded by var, let, or const. Such a “bare” variable declaration is treated as a notebook global. It can be accessed and reassigned in another cells; however, note that any complex datatypes are frozen when they cross cell boundaries.
Variables declared with var, let, or const are local to the cell in which they are declared and are not in scope in any other cell.
Exceptions to ordered reactivity#
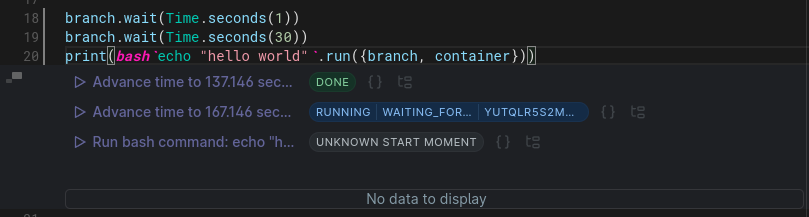
The Antithesis notebook is functional and reactive, but the world outside is not. If a cell contains code that issues network requests to another system, that cell automatically recalculating could cause accidental havoc. But we want our notebooks to be as powerful as any other computer program, and that includes the ability to make network requests with expensive or destructive effects. Our solution to this is actions.
The action system is a bridge between the functional reactive world of the notebook, and the messy, mutable, expensive world outside. Cells containing actions recalculate as normal when any of their inputs change. However the code guarded by the action does not run until a human being clicks a UI element or otherwise triggers the action. The action UI looks like this:
For example, queries like up_to talk to our database if the results are not already in the browser cache, so they spawn an action.
Actions are most commonly used in cells that issue network requests, but they may also be used to guard notebook cells that do some purely functional, but extremely slow, computation which you do not want running without explicit authorization.
Viewing output#
The notebook has a built-in function, print, which can be used to display a human-readable representation of the value of any variable. You may use the hotkey CtrlP to quickly wrap or unwrap a print(...) statement around a line of code.
Each cell has a hard limit on the vertical height of its output. If you try to print a vast amount in a single cell, a scrollbar will appear in its output area. Normal scrolling with your mouse wheel will scroll the entire notebook, but holding down Alt while scrolling will scroll the cell output area under the mouse pointer.
If you want to see more of a cell’s output, you may pop out the contents of the cell by clicking the icon to the left of the fold button. This will expand the output of the cell to occupy the entire right pane of the window. Multiple cells may be popped out simultaneously, and can be switched between using the tabs at the top of the pop out area.
Alternatively, cell outputs and cell texts may be folded up to conserve screen real estate by clicking the little arrow to the left of the output area. Folding is a purely visual change, and does not affect the cell’s recalculation in any way.
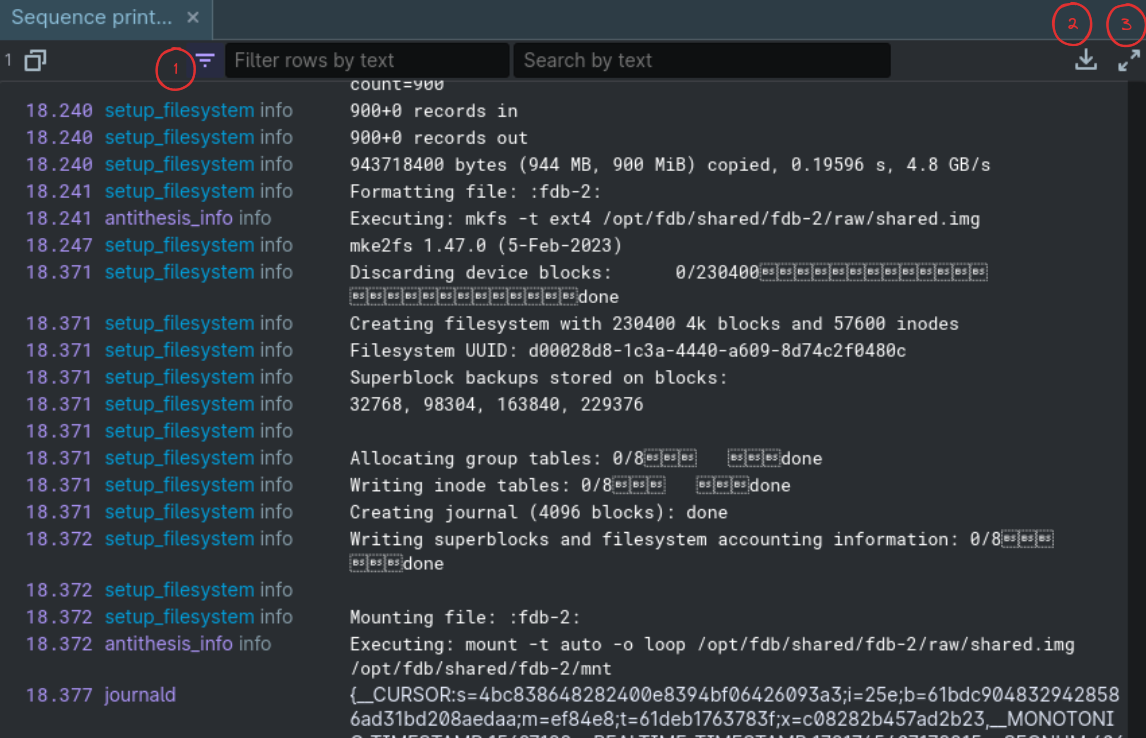
Sequence printer#
Printing an EventSequence produced by evaluating an event set will result in a special UI element optimized for viewing, searching, and filtering log messages and other system output.
Holding down the Shift key and clicking the left mouse button enables you to select multiple log lines. These log lines can then be copied in a useful text representation with the copy button.
Take note of the various other capabilites in the toolbar:
Filter to particular categories of logs
Download the selected logs, or if none are selected, the full log.
Open a fullscreen view of the sequence printer (this is only available when the sequence viewer is popped-out)
In these toolbar features, there are mouse and keyboard shortcuts for navigating quickly and accurately through the logs:
Scroll: move the viewport by a small fixed pixel amount
Shift + Scroll: move the viewport a large portion of a page
Shift + Up or Page Up: move the viewport by a full page, similar keybinds exist for moving down.
Ctrl + Up: move the viewport by a single item, similar keybinds exist for moving down.
Home / End: jump to the start or end of the list respectively.
Discoverability and help#
Antithesis provides special function, called help(), which serves as an in-notebook reference. Calling help() with no parameters will print a list of help topics. Passing a class, class instance, function, or method to help() will print documentation for that parameter.
The notebook supports autocomplete by typing CtrlSpace. This autocomplete works in three main scenarios:
inside function argument lists where it will list the expected arguments and their types.
indexing objects eg
foo.<HERE>where it will list all available properties onfoooutside any context where it will list all available symbols.
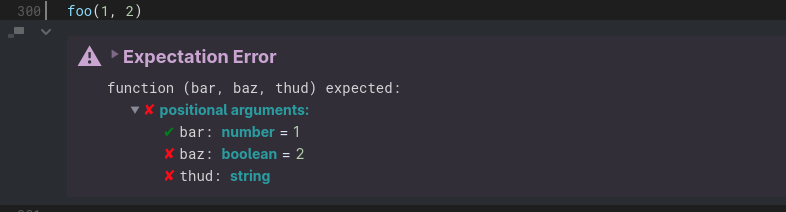
Calling a function with the wrong number of type of parameters will print an expectation error. This error dialog will tell you the expected arguments of the function, and what you provided.
Other UI features#
There are a few other little things that just make life easier.
Editor UI#
Any Markdown titles printed in the notebook (using the md tagged template literal) will populate the table of contents accessible with this icon at the top of the notebook. Clicking a table of contents entry will jump to the associated section of the notebook.
Dark mode: If you prefer dark mode, this icon will toggle to an alternate color scheme that will save your eyesight.
No presentation: If you don’t care about seeing the “pop-out” UI area to the right, this icon will cause the code editor to fill the entire width of the window.
Presentation mode: The presentation mode toggle will hide all of the code in your notebook, and only show cell outputs.
This is actually how all of our reports are generated
Revert local changes: This button will reset the state of your notebook to the template that was present when you first opened it. It can be undone with Ctrl + z
Editor hotkeys#
Some of the most frequently used hotkeys are:
Ctrlp: Wrap or unwrap the print() function around the current line of code.
Ctrl/: Comment/uncomment the currently selected code.
CtrlSpace: Trigger autocomplete.
CtrlEnter: Authorize all actions (if any) in the current cell. This is beta functionality.
You can see all available hotkeys by clicking on Editor commands or by pressing F1.